Manual for Import/Export tool for K2
This component enables to create K2-items via CSV-file import. You can import all fields including “extra fields”, images and tags, galleries etc.
ATTENTION: This is not a good component for regular backups. It’s much better to back up the database directly! Use this extension for transferring items to/from K2, mass updates in K2 and so on, but do not rely on it as your only backup.
-
Install the component
-
Create a CSV - File
- create a CSV file with all the values you would like to import (TIPP: It might be easier just to create some items and then to click the big “Export” button. Then you will have a nice example - only the images are not exported)
- one very easy way to create the CSV-file is to create a spreadsheet with LibreOffice and save it as a CSV or to use first the export function (TIPP: In my experiences LibreOffice handles CSV files much better than Excel)
- each row in the csv-file needs a headline
- each column must be separated by “,”
- text-fields must be enclosed within double-quote characters => "
- csv file should be utf-8 encoded, you can tranlate the encoding while importing but you will have less problems if you save the file as UTF-8
- you don’t need to create all columns. Create just the columns you need.
- here some tips for special columns:
-
import tags
- separated tags by comma “,”
- if the tag do not exist, a new will be created
-
import extra fields
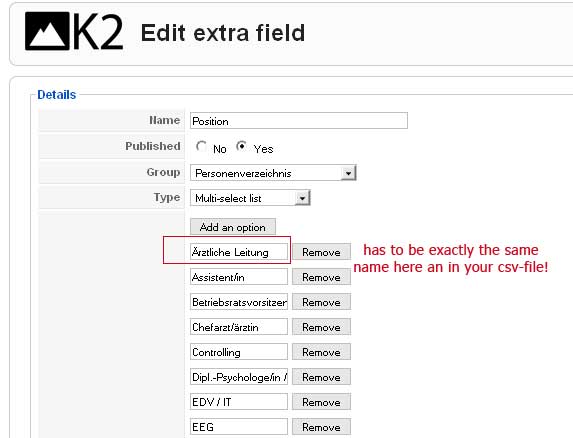
- if you want to import extra fields, the name of the option in the row and the values of the multi select list, drop down selection,…. has to be identical for multi select lists : “option 1, option 3”
- for importing links create a column with the format: “Link-Text;URL;Open-In” the Open-In value can be “same”,“new”,“popup” or “lightbox”
-
import attachments
- for every attachment you can create 3 columns: “path to a file”, “Attachment Title”, “Attachment Title Attribut”
- the “path to a file” can be the path to an existing file on your server or since an URL
- alternatively you can use a ZIP file to upload all the attachments together with the CSV file (see step 3: “pack all files into a ZIP archive”). If you like to do so the path to the file would be: <joomla_tmp_dir>/k2_import/<file_name> e.g. tmp/k2_import/pastarchives.jpg
- you can import as much attachments as you like, just create the three columns for each attachment
-
import images
- for the import of the image you can create three columns: “Image” (path to an image), “Image caption” and “Image credits”
- the “path to an image” can be the path to an existing file on your server or an URL.
- alternatively you can use a ZIP file to upload the image together with the CSV file (see step 3: “pack all files into a ZIP archive”). If you like to do so the path to the file would be: /<joomla_tmp_dir>/k2_import/<file_name> e.g. tmp/k2_import/pastarchives.jpg
- this imge will be single k2 item-image. K2 saves the image in a lot of different sizes and it tooks a lot of time to create them. If you have a huge amout of images your server may run on a time-out. Check the PHP manual to set up longer execution time.
-
import gallery
- for import images to a gallery or an existing gallery create to columns in the CSV-file: “Gallery Name” and “Images for the Gallery”
- the column “Images for the Gallery” is a comma separated list of imagefiles
- this files can be the path to an existing file on your server or an URL
- alternatively you can use a ZIP file to upload all the images together with the CSV file (see step 3: “pack all files into a ZIP archive”). If you like to do so the path to the file would be: `/<joomla_tmp_dir>/k2_import/<file_name>
- if there is already a gallery with this name (under
/media/k2/galleries/ ) it will be used for this item and all images from the column “Images for the Gallery” will be copied there - if there is no gallery with this name a new will be created and all images from the column “Images for the Gallery” will be copied there
-
import categories
- you can set-up a category for every single item in you CSV. Create three column: “category name”, “category description” and “category access”. The access level could be 0 for Public, 1 for Registred or 2 for Special
- later you will be able to choose a main category, so the category in the CSV-file could also be a sub-category
-
-
pack all files into a ZIP archive you can pack all the attachments, images and the CSV-file inside a ZIP archive. If you do so the path to the images and attachments should be <joomla_tmp_dir>/k2_import/<file_name> e.g. tmp/k2_import/pastarchives.jpg
-
upload the Import file
- start the component (Components -> K2 Import / Export)
- use the upload field in the upper part to load the CSV or the ZIP to upload the file to joomla.
-
adjust the settings for the import in this step you can adjust some settings:
- select a file to import (if there a several CSV file in the ZIP archive)
- select a main category. I you choose one here, all the categories in the CSV would be sub categories, if there are no categories inside the CSV all items will be placed inside the choosen “Main Category”.
- you can also let the importer try to recognize that the category already exists regardless of the level. E.g. if you have the category name “cat1” in your CSV the importer will search for that name in all levels and import the items into the first category it finds
- if you don’t choose a “Main Category” you can choose a “Extra field group”. This group will be associated with all new categories
- it’s possible to overwrite existing items by the imported
- if your file or database is NOT UTF-8 encoded, you can try to convert the charset. But this is not recommended, it’s best to use UTF-8 everywhere.
-
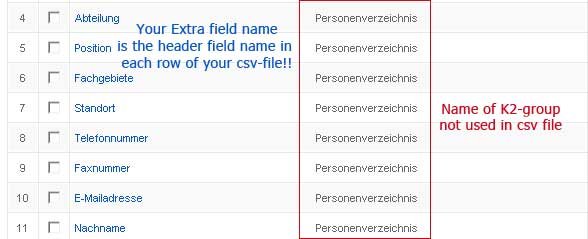
associate the fields after pressing “Continue” you can associate the K2 values (left site) with the columns in the CSV-file. Just the associated values will be imported, the rest will be ignored. At the moment there is no automatic association.
-
Watch/control the result in K2 items
-
Export for the export just use the big “Export” button in the upper right corner. You will get a CSV file which you could import again